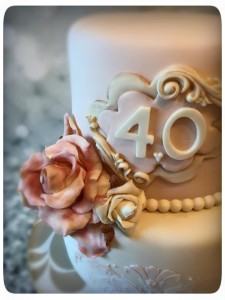
Vintage Plaque Tutorial
Have you ever needed to make an unique plaque on a cake? Here is a quick little
tutorial to show you how just layering elements and applying some petal dust for dimension can give you a very simple but elegant plaque.
The Tools & Ingredients
Here is a list of all the tools and ingredients that you will need to create a vintage plaque.
- Tools
- Wilton Flower Cookie Cutter set (Needs to be a set so you can get different sizes). I look for the metal ones so I can give them a slight squeeze to make an oblong size.
- Corn starch for dusting
- 9″ fondant rolling pin
- Tappits or Letter Molds (in your desired size)
- Xacto or Paring Knife
- Filigree Mold
- Paint Brushes (soft tip)
- Ingredients
- Ivory Modeling Chocolate
- Sage Green Modeling Chocolate or another complimentary color to your cake design. Softer colors work great for the vintage look.
- Petal Dust (Theobromia or Cocoa Brown)
- Gum glue
Step-by-Step
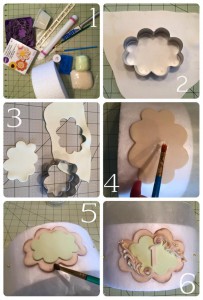
Step 1: Make Filigree
Start by pressing your ivory modeling chocolate into filigree mold and freeze.
Step 2: Make Background
Roll out your ivory modeling chocolate to 1/16″ then use second largest metal petal cutter to cut out. Tip: use metal so you can squeeze it slightly to get oblong shape to the petals. Then place on your curved form. I cut an 8″ dummy in half to use as a molded form since I will be placing on an 8″ cake and I want the proper curve.
Step 3: Make Foreground
Roll out your complimentary colored modeling chocolate to 1/16″ (for this tutorial I am using pale green). Use the next size down of the metal cutter doing the same squeeze technique.
Step 4: Assembly
Apply a small bit of gum glue to the center of the larger piece and place the smaller piece in the center. Tip: leave the edges of the smaller piece curled up a bit. You want to be able to dust underneath for dimension.
Step 5: Adding Dimension
Lightly apply Theobromia petal dust to the edges of the larger piece and slightly under the smaller piece for dimension. Then tap the curled edges of the smaller piece down.
Step 6: Adding Character
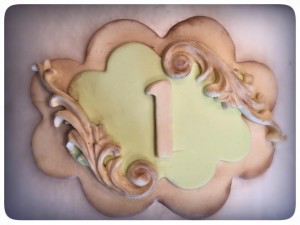
Unmold the filigree pieces and apply with gum glue. Give them some time to dry (about 15 minutes) and then come back and dust with some Theobromia petal dust in the creases for an aged effect.
Use Tappits or other mold to put your number or initial in the middle. Voila. You are done. Set aside to dry and apply to your cake later with a little royal icing or gum glue.
